This tutorial follows on from Building an Image from a Dockerfile (and adding to the DkIT Registry) and is part of a series. If this is your first time here, maybe start at the beginning.
Now that your Docker image has been by built and is available from the DkIT Registry, you can finally create and run a container! Let’s look at how exactly you would do that in this tutorial.
First though, you need to understand how this works. There are 2 Registries available to you in http://docker.comp.dkit.ie
DockerHub (aka “Docker Hub” aka “Docker Registry”)
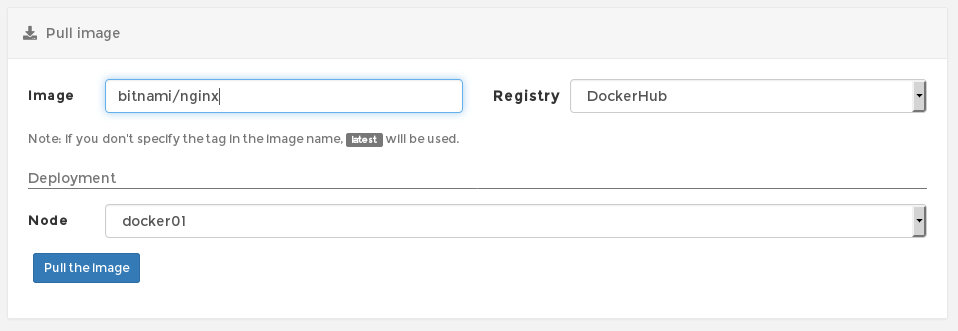
Docker Hub is a service provided by Docker for finding and sharing container images. As a student using our web frontend, you can pull (but not push) any image you like from Docker Hub to use in your container, as long as you know the name of. For example, the official Nginx image is just called nginx, but there are many other Nginx images. For example, Bitnami have their own Nginx image called bitnami/nginx and you would pull it like this:
But hey, why bother with any of the images on DockerHub when we have built and uploaded our own Nginx image to the DkIT Registry?
DkIT Registry
We run a full, local image registry here on campus for the storing of student Docker images. You can push as many unique images (or tagged versions of existing images – read more about tags here) to the registry as you wish, and then pull them when creating containers (unlike DockerHub which is “pull only” inside our web frontend).
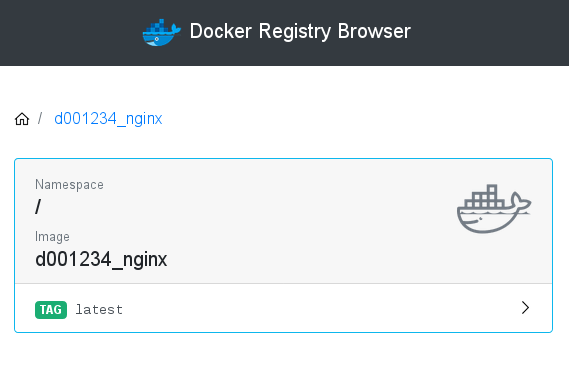
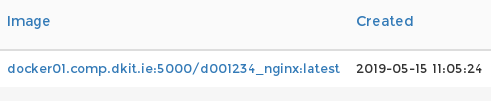
While on campus, you can also browse the registry via http://docker01.comp.dkit.ie:10000/ (it’s actually also a container!) Here’s our recently tagged and uploaded image d001234_nginx as seen in the browser:
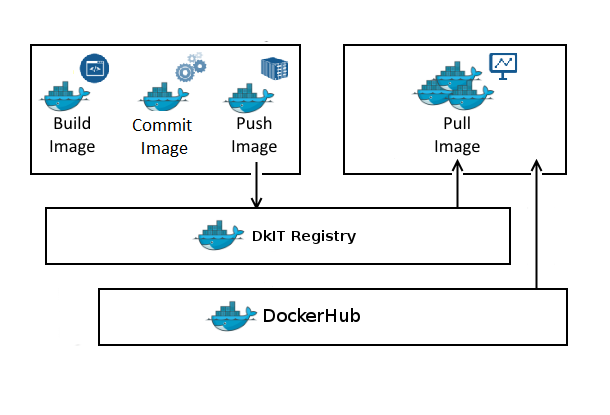
 So to be clear, you can pull from DockerHub and the DkIT Registry, push to to DkIT Registry only. Okay? Here’s a diagram in case it’s not!
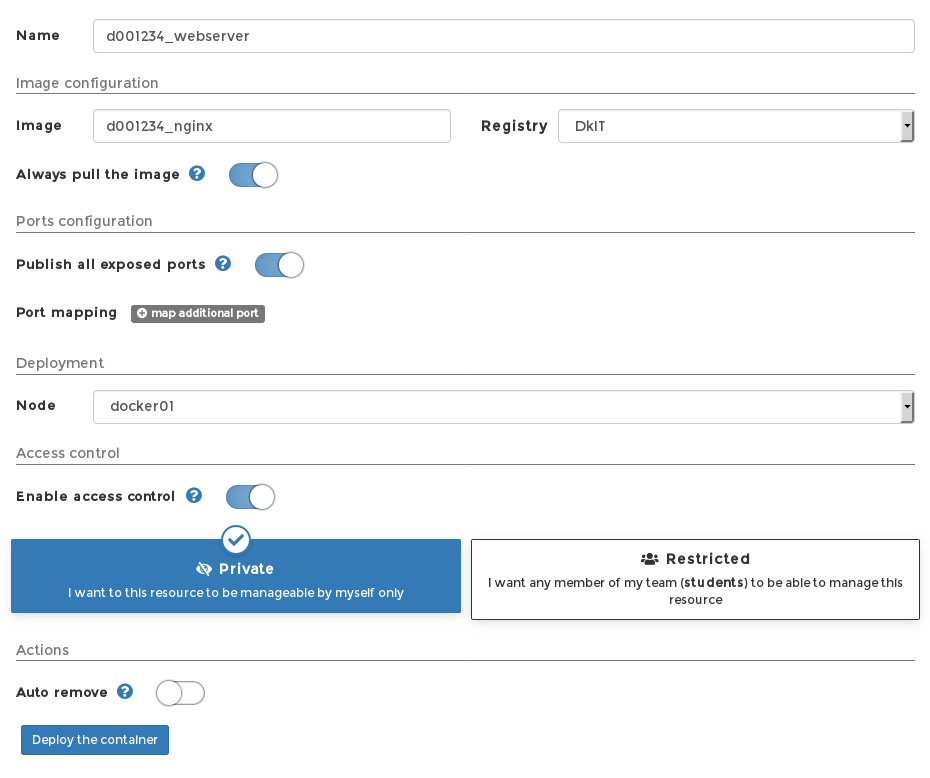
Enough talk, let’s fire up our container. click the Containers menu, and the Add container to create your first instance. Give it a sensible name consistent with other naming conventions to date (eg. “d001234_webserver”).
Specify the name of the image you want to pull from the DkIT Registry (eg “d001234_nginx”) and be SURE to drop down the Registry selector to DkIT – DockerHub won’t have a copy of your image.
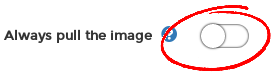
Always Pull The Image does what it says – it pulls down the image even if your local version of the image still exists (which currently, it does, unless it’s been a while and a cleanup script has removed it). Let’s Pull anyway just in case..
Note: if you just recently created an image locally and did NOT Push it to any registry, but would still like a container from it now, turn this option OFF. This is good for testing an new image before committing it to the registry. The Registry dropdown MUST be left at “DockerHub” for this function to work correctly. Also, the Deployment node MUST be the same node the image resides on.
Publish all exposed ports will create a NAT mapping to the deploy host (either docker01 or docker02) for any ports the container needs open. Remember, we are running a web server and explicitly opened port 80 when building our image:
EXPOSE 80
so this is required.
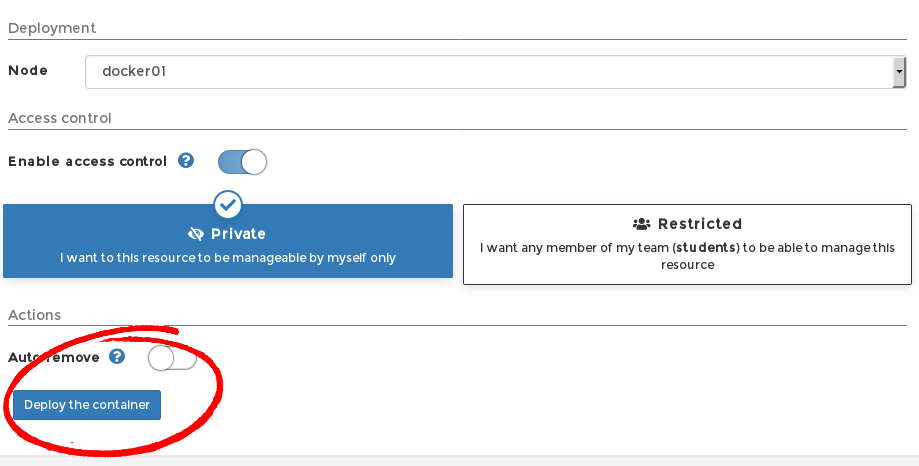
The Deployment Node doesn’t really matter, your container can run perfectly well on either Docker host.
Access Control let’s you decide if only you can manage this container, or if it will be available to everyone else. Who knows, you might be building a handy tool that other students can use in their projects? However, for the moment, keep it private.
Autoremove destroys the container after it stops. This is useful if you are building a “run once” service eg. copy mails from one SMTP server to another using a bash script. For something like a web server though, you would leave this off.
Here’s how this all looks so far:
but don’t deploy just yet!
Looking at the Advanced container setting below, there are a couple of things you need to set.
Firstly, if you want to connect to your container via the web console, plus keep STDIN running even when not attached to the container, then select Interactive & TTY in the Console options under Command & logging.

Remember the Private Network we created in our first tutorial? The next settings is why we created that first! Go to to the Network tab and select your Private Network (eg. “d001234_network”) from the dropdown.
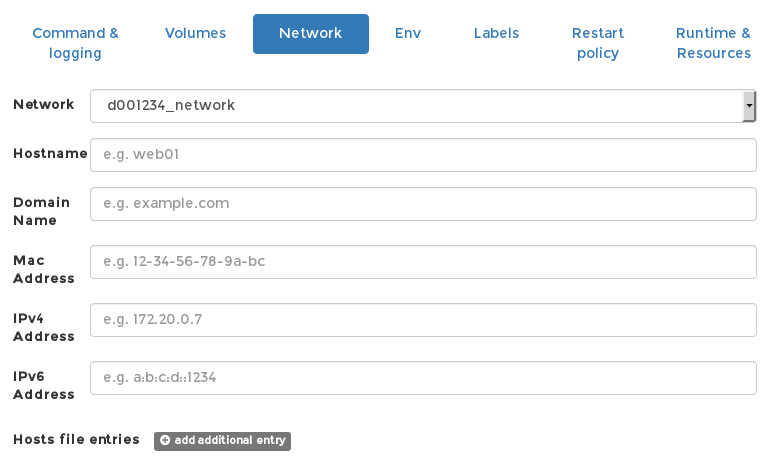
You can configure plenty of other things, like Restart Policy and Environment Variables, but for now we have what we need (though mapping additional Volumes is REALLY useful as it allows data to survive after the container ceases to exist, or allows you to create a fully writable layer at a mount point where one previously did not exist).
Go ahead and Deploy the container.
The first thing that will strike you is just how fast it is deployed. All going well, we’re talking fractions of a second.

There’s a lot to see about our new container on the Containers page, so let’s break it down.
The Name and the State are obvious enough, but it’s the available Quick actions that we’re immediately curious about.
Logs – what it says on the tin. Here you can view system logs generated by your container. If something is not working, this is the first place to look. The output of your app can also be viewed here (ie. the ENTRYPOINT command’s output just as it would appear if you ran the command interactively in a terminal).
Inspect – let’s you view low-level information about your container in JSON format. The output can viewed as a tree or as raw text.
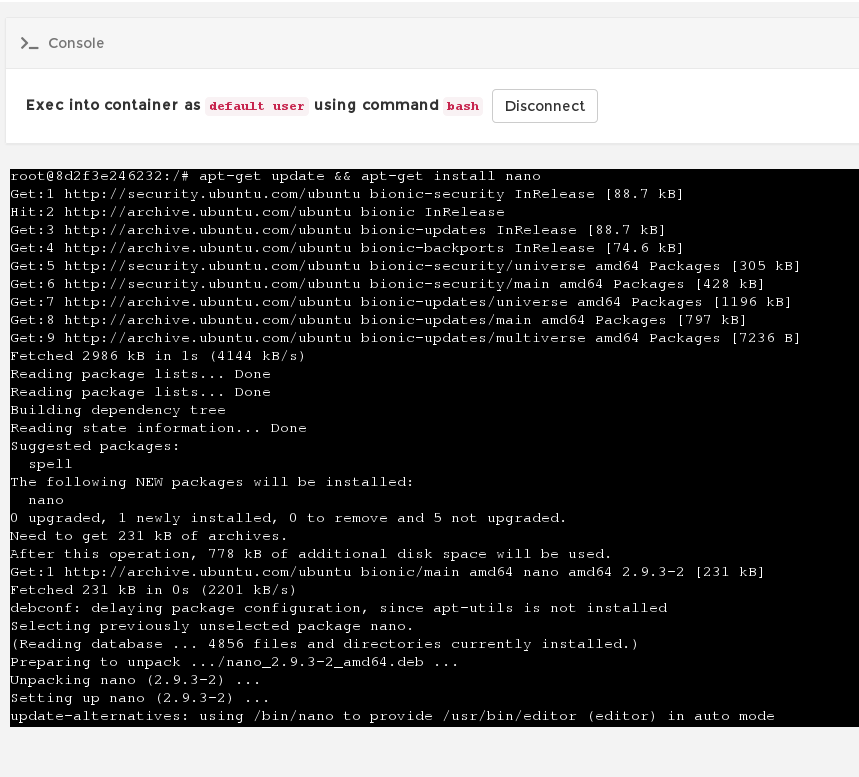
Console – probably the most useful action, as this lets is drop to a terminal inside the container (thanks to options we selected earlier) and install additional packages, edit files, restart services etc).

Just remember, your container is likely built on a VERY minimal OS image, it has only the most basic commands available. For example, if you suddenly want nano, you need to update the package list and install it. Linux skills required!
The image tag confirms what was used to create this container and where we pulled it from (docker01.comp.dkit.ie:5000 is the address of the DkIT Registry).
The network information shows up which host our container is actually running on behind the web frontend, and importantly, what port has been mapped to the containers port.
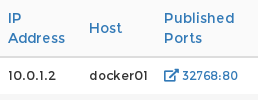
Here we see that our Nginx web server is available on docker01, and running on port 32768 of that host via NAT (port 80 on the container). So we can view our containers output by visiting (internal to DkIT) http://docker01.comp.dkit.ie:32768 in our browser. Let’s try just that:
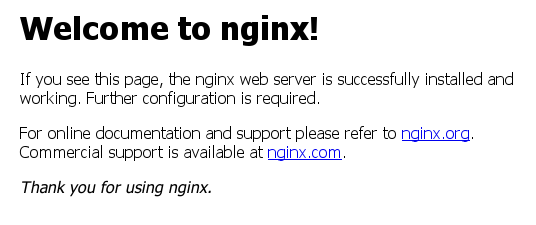
Holy sh*t! It works. Note that this port 32768 we were given is temporary and only assigned to this instance – it can change if we recreate the container or even just restart it.
Later on we will look at accessing this container inside our private network, which is available on the regular (and permanent) Port 80 in there. For now you use the console to edit or create new web files, but note when this container is destroyed all that is gone. If there is files that should always exist, you ideally would add them when writing your dockerfile using ADD or something like:
RUN echo "Some line to add to a file" >> /etc/sysctl.conf
for new content, or
RUN sed -i "s|some-original-string|the-new-string |g" /etc/sysctl.conf
if you need to replace content. Again, some Linux skills required 🙂
Alway remember, containers should be ephemeral! It is your best interest to design and build Docker images that can be destroyed and recreated/replaced automatically or with minimal configuration. We can’t stress this enough.
Also, while we’re discussing best practice, remember that one container should have one concern. Think of containers as entities that take responsibility for one aspect of your project. So design your application in a way that your web server, database, in-memory cache and other components have their own dedicated containers. If we suddenly decide we need a MySQL Server, that’s another container we should be creating. Stop thinking like you did when you used VMs in the past!
Back to the web frontend, you’ll notice can also click into your container, which will not only let you see the same information in a better view, but will give you access to actions (Start, Stop, Kill, Restart etc etc) and the ability to attach a different network to your container.

Duplicate/Edit is really useful if you need to alter the container in any way (eg. add environment variable) and then fire it up again under a new name, removing the previous instance afterwards if need be.
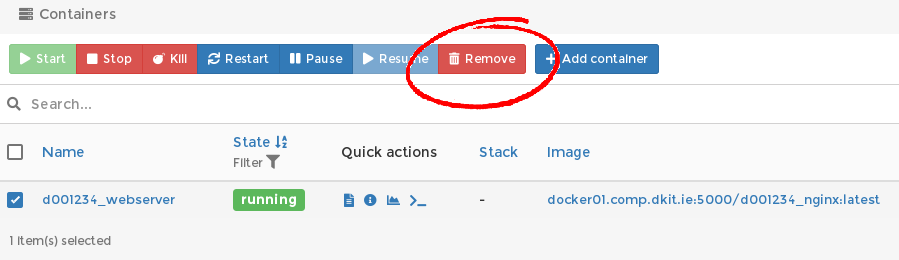
Now that we know our image works, we can destroy this particular container and create a new one later if need be. If asked, “Automatically remove non-persistant volumes” is a good idea. It keeps the system tidy (unless you want to re-attach those volumes to a container later on, in which case, say “no”).
Next we will look at Using Pre-Built Docker Container Templates, which can be a massive time saver, kinda like the “Quick Instances” we use in XOA.