This tutorial follows on from Using Pre-Built Docker Container Templates and is part of a series. If this is your first time here, maybe start at the beginning.
We are going to recreate tutorial Create a WordPress Post from Node.js (which used VMs) but this time with Docker containers.
In the last tutorial we set up our 3 containers from the “App Templates”. We created a MariaDB instance, A WordPress Instance and a Node.js Instance. Remember, one container does ONE thing, so the WordPress container only has a web server running PHP (with the WordPress files included). It has no database (hence MariaDB) and we still need to run the WordPress setup to complete installation of the CMS. Let’s do that now.
Looking at our 3 containers, we can ascertain the address of the servers both on the private internal network and the DkIT external network. Obviously, when you try this yourself the addresses will all be slightly different… duh (the “duh factor” just raised the difficulty level on this tutorial by one star #justsaying)
Our WordPress server resides internally at 10.0.1.14 and is available on the usual port 80 for web traffic. This address can also be reached by other containers on our private network because of how we set it up.
On the host (docker01) the same container can be reached on port 32774. This means http://docker01.comp.dkit.ie:32774 in the browser (works inside DkIT only. See next tutorial in the series for accessing externally).
Let’s try that:
Great, that works. Continue to the next screen however, you will see that WordPress is going to want a database to connect to, something we don’t have yet as there is no database included in this container.
So what we need to is create a database, a user and a password that WordPress can use to complete setup. We need to this on our MariaDB container.
Open the Web Console on the MariaDB container. We’re going to send in a custom command that will initiate a connection to MySQL and prompt us for the root password (you still have that, don’t you?!)
You will then be dropped to the MySQL prompt and asked for the password.
Once successfully authenticated, enter the following SQL to create our database and user/password (this can be copied and pasted if you wish).
CREATE DATABASE wordpress;
CREATE USER 'wpuser'@'localhost' IDENTIFIED BY 'password2019';
CREATE USER 'wpuser'@'%' IDENTIFIED BY 'password2019';
GRANT ALL PRIVILEGES ON wordpress.* TO 'wpuser'@'localhost';
GRANT ALL PRIVILEGES ON wordpress.* TO 'wpuser'@'%';
FLUSH PRIVILEGES;
EXIT;
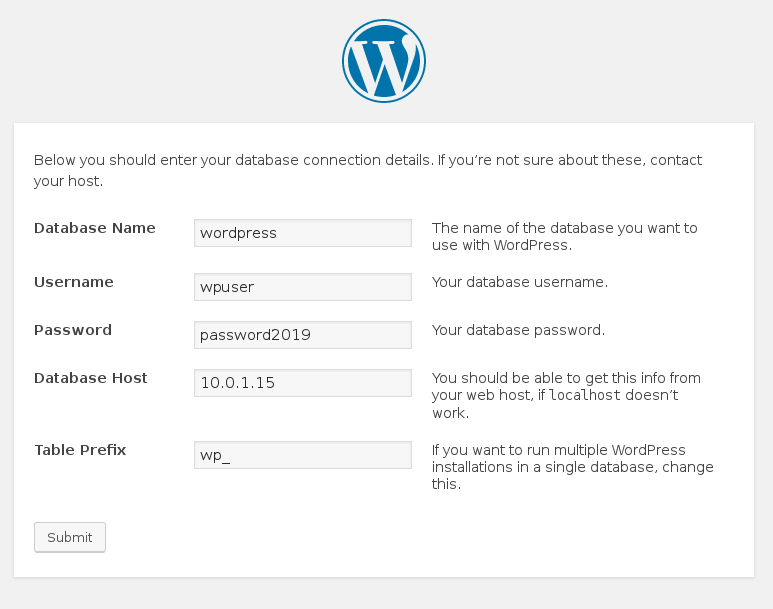
You can now Disconnect the web console and return to your WordPress setup. Enter the details of the database we just created, including the user, (terribly insecure) password and the internal ip address of the database host.
Submit and finish the WordPress setup, which includes the creation of a WordPress user login. Verify that your login works before going any further.
Once you are happy, logout and return to the frontend homepage of your WordPress at (in our case) http://docker01.comp.dkit.ie:32774
Now, to create the client “app”. Use the web console to connect to the shell on your Node.js container as “root” (you don’t need to know the password). Out of curiosity, let’s see what the base OS layer is for this.
root@e4541a284376:/# cat /etc/issue
Debian GNU/Linux 9 \n \l

root@e4541a284376:/#
It’s built on Debian, nice. Let’s bring the software all up to date with
apt-get update && apt-get dist-upgrade
and change to the node home directory.
cd /home/node/
Now, as per the original tutorial, we need to install node-wordpress, a node.js JavaScript client for working with WordPress.
npm install wordpress
You might some some warnings, but an ls of the node_modules directory will reveal that the correct files were indeed installed.
root@e4541a284376:/home/node# ls node_modules/
sax  wordpress  xmlbuilder  xmlrpc
root@e4541a284376:/home/node#
Now let’s create and edit our wordpress.js file:
root@e4541a284376:/home/node# nano wordpress.js
bash: nano: command not found
root@e4541a284376:/home/node#
Oh that’s right, we’re working with containers now. Only what is needed is included, so we are going to have to install nano (if we were doing things right, we would have built our own image and included the contents of wordpress.js from the start).
apt-get install nano
NOW we can create and edit our file! Include the following (you can copy/paste) and modify to your needs. Press CTRL + X to save and exit the file editor.
var wordpress = require( "wordpress" );
var client = wordpress.createClient({
    url: "10.0.1.14",
    username: "itlc",
    password: "W^8lY1rcI@hRDjTicc"
});

client.newPost({
        title: "Post from Node.js",
        content: "This post was sent remotely from Node.js.....",
        status: "publish",
        termNames: {
                "category": ["Javascript", "Node"],
                "post_tag": ["api", "js", "remote"]
        }
}, function( error, data ) {
        console.log( "Post sent! The server replied with the following:\n" );
        console.log( arguments );
        console.log("\n");
});
To execute, run
nodejs wordpress.js
which should output something like
Post sent! The server replied with the following:

[Arguments] { '0': null, '1': '5' }
This looks promising. Go back and refresh your WordPress homepage in the browser:
Tada! It works.
This is what you might call a proof of concept. We’ve shown that all the separate containers used in our project can communicate over the private network but can also be accessed on the DkIT network.
What you would do next is build fresh images that include all the correct files (eg. wordpress.js) and configurations (database username, password etc) so less installing/editing etc would be done on the containers. The app container would do it’s work via ENTRYPOINT and then shutdown, it’s purpose in life fulfilled.
But you’ve proven your app will work, and have the ability to test your code easily. THIS is what Docker is all about.
Next we’ll just have a quick look at how you might test from OUTSIDE the college, and then we’re done with this introduction to our new Docker environment.
