Somebody posted a tutorial on YouTube showing a LED blinking “hello world” in Morse code using a Raspberry Pi. However, they only show the code executing, not how it was put together. They also don’t show the hardware setup 🙁
“Fair enough”, we thought here at the ITLC, and decided to have a go ourselves. This is how we think it works, but try it out yourself!
You will need:
You will need to download and install the Python RPi.GPIO library.
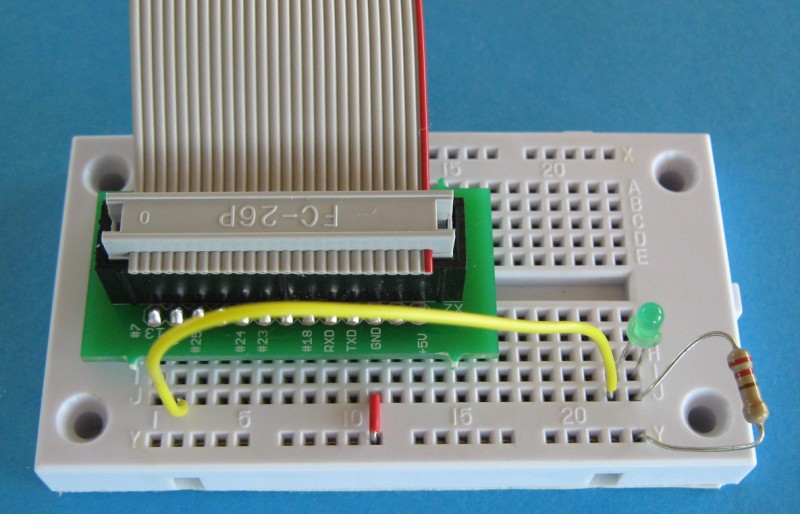
Plug your ribbon cable into your breakout board and the breakout board into your breadboard. Plug the other end of the ribbon cable into your Raspberry Pi, being careful to ensure that the red stripe corresponding to pin 1 is on the correct side (it should be at the edge of the board).
Wire up the LED through the 220Ω current-limiting resistor to a pin of your choice, observing the polarity of the LED. (The flat side of the LED should be connected to the ground pin, and the other side should be connected to the GPIO pin.) Your breadboard should now look something like this:

Here, pin 8 has been used to control the LED.
If you wish to drive a much larger LED or another device which draws more power you will need to use a transistor so as not to burn out the Pi’s pin.
Now that our circuit is wired up correctly (you can connect to 3.3V instead of the GPIO pin to test it’s working), it’s time to get programming!
In a terminal, type
sudo python
to get a Python console running as root – this is necessary as GPIO pin access isn’t available in userspace.
Now :
import RPi.GPIO as GPIO
import time
pinNum = 8
GPIO.setmode(GPIO.BCM) #numbering scheme that corresponds to breakout board and pin layout
GPIO.setup(pinNum,GPIO.OUT) #replace pinNum with whatever pin you used, this sets up that pin as an output
#set LED to flash forever
while True:
  GPIO.output(pinNum,GPIO.HIGH)
  time.sleep(0.5)
  GPIO.output(pinNum,GPIO.LOW)
  time.sleep(0.5)
Your LED should now be flashing: success! You can now control your LED from Python. You can stop the flashing by pressing Ctrl-C.
Now let’s write a program (morse.py) to translate your input to LED Morse code.
import RPi.GPIO as GPIO
import time


CODE = {' ': ' ',
        "'": '.----.',
        '(': '-.--.-',
        ')': '-.--.-',
        ',': '--..--',
        '-': '-....-',
        '.': '.-.-.-',
        '/': '-..-.',
        '0': '-----',
        '1': '.----',
        '2': '..---',
        '3': '...--',
        '4': '....-',
        '5': '.....',
        '6': '-....',
        '7': '--...',
        '8': '---..',
        '9': '----.',
        ':': '---...',
        ';': '-.-.-.',
        '?': '..--..',
        'A': '.-',
        'B': '-...',
        'C': '-.-.',
        'D': '-..',
        'E': '.',
        'F': '..-.',
        'G': '--.',
        'H': '....',
        'I': '..',
        'J': '.---',
        'K': '-.-',
        'L': '.-..',
        'M': '--',
        'N': '-.',
        'O': '---',
        'P': '.--.',
        'Q': '--.-',
        'R': '.-.',
        'S': '...',
        'T': '-',
        'U': '..-',
        'V': '...-',
        'W': '.--',
        'X': '-..-',
        'Y': '-.--',
        'Z': '--..',
        '_': '..--.-'}
ledPin=9
GPIO.setmode(GPIO.BCM)
GPIO.setup(ledPin,GPIO.OUT)


def dot():
	GPIO.output(ledPin,1)
	time.sleep(0.2)
	GPIO.output(ledPin,0)
	time.sleep(0.2)

def dash():
	GPIO.output(ledPin,1)
	time.sleep(0.5)
	GPIO.output(ledPin,0)
	time.sleep(0.2)

while True:
	input = raw_input('Please enter yout text to send.')
	for letter in input:
			for symbol in CODE[letter.upper()]:
				if symbol == '-':
					dash()
				elif symbol == '.':
					dot()
				else:
					time.sleep(0.5)
			time.sleep(0.5)
Things to note:
CODE['Z']will return'--..', the Morse code for Z- There are only upper case characters,
'z'.upper()will return'Z' - A dot should correspond to the LED being on for about half the time of a dash
- You will want a pause between each character and for a space
- You can get input from a user with
raw_input('this is the prompt to be displayed ') - In Python, you can loop through a string one character at a time with
    for letter in string:
      print(letter)
You can now go ahead and run the program, entering “Hello World” when prompted. The message should output to the LEDs in Morse code, all going according to plan. After that, enter any message you want, this is now a complete Morse code translator!


