In this tutorial, we are going to create a Shopping Cart using HTML and CSS. We’re going to use Google Fonts for this tutorial, more specifically “Roboto.”
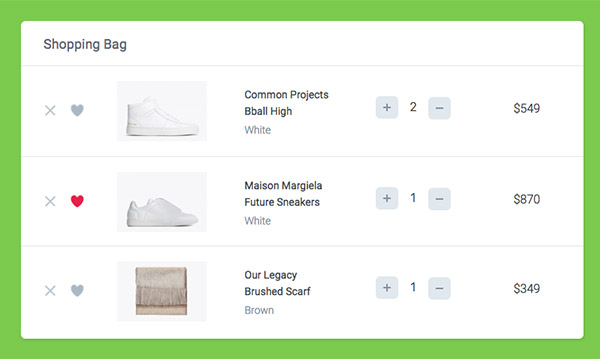
The finished product will look something like this:
HTML Part
Let’s create our HTML structure.
First, we need a container div, which we’ll call “.shopping-cart”.
Inside the container, we will have a title and three items which will include:
- two buttons — delete button and favorite button
- product image
- product name and description
- buttons that will adjust quantity of products
- total price
<div class="shopping-cart">
  <!-- Title -->
  <div class="title">
    Shopping Bag
  </div>

  <!-- Product #1 -->
  <div class="item">
    <div class="buttons">
      <span class="delete-btn"></span>
      <span class="like-btn"></span>
    </div>

    <div class="image">
      <img src="item-1.png" alt="" />
    </div>

    <div class="description">
      <span>Common Projects</span>
      <span>Bball High</span>
      <span>White</span>
    </div>

    <div class="quantity">
      <button class="plus-btn" type="button" name="button">
        <img src="plus.svg" alt="" />
      </button>
      <input type="text" name="name" value="1">
      <button class="minus-btn" type="button" name="button">
        <img src="minus.svg" alt="" />
      </button>
    </div>

    <div class="total-price">$549</div>
  </div>

  <!-- Product #2 -->
  <div class="item">
    <div class="buttons">
      <span class="delete-btn"></span>
      <span class="like-btn"></span>
    </div>

    <div class="image">
      <img src="item-2.png" alt=""/>
    </div>

    <div class="description">
      <span>Maison Margiela</span>
      <span>Future Sneakers</span>
      <span>White</span>
    </div>

    <div class="quantity">
      <button class="plus-btn" type="button" name="button">
        <img src="plus.svg" alt="" />
      </button>
      <input type="text" name="name" value="1">
      <button class="minus-btn" type="button" name="button">
        <img src="minus.svg" alt="" />
      </button>
    </div>

    <div class="total-price">$870</div>
  </div>

  <!-- Product #3 -->
  <div class="item">
    <div class="buttons">
      <span class="delete-btn"></span>
      <span class="like-btn"></span>
    </div>

    <div class="image">
      <img src="item-3.png" alt="" />
    </div>

    <div class="description">
      <span>Our Legacy</span>
      <span>Brushed Scarf</span>
      <span>Brown</span>
    </div>

    <div class="quantity">
      <button class="plus-btn" type="button" name="button">
        <img src="plus.svg" alt="" />
      </button>
      <input type="text" name="name" value="1">
      <button class="minus-btn" type="button" name="button">
        <img src="minus.svg" alt="" />
      </button>
    </div>

    <div class="total-price">$349</div>
  </div>
</div>
CSS Part
Make sure you include the font we use for this tutorial.
Now, let’s add some style to our body with the following lines:
* {
  box-sizing: border-box;
}

html,
body {
  width: 100%;
  height: 100%;
  margin: 0;
  background-color: #7EC855;
  font-family: 'Roboto', sans-serif;
}
Great, now let’s make our Shopping Cart to be 750×423 and style it to look nice. Notice that we are using flexbox, so we set it to display flex and make the flex direction column, because by default the flex direction is set as row.
.shopping-cart {
  width: 750px;
  height: 423px;
  margin: 80px auto;
  background: #FFFFFF;
  box-shadow: 1px 2px 3px 0px rgba(0,0,0,0.10);
  border-radius: 6px;

  display: flex;
  flex-direction: column;
}
Next, let’s style the first item, which is the title, by changing the height to 60px and giving it some basic styling, and the next three items which are the shopping cart products, will make them 120px height each and set them to display flex.
.title {
  height: 60px;
  border-bottom: 1px solid #E1E8EE;
  padding: 20px 30px;
  color: #5E6977;
  font-size: 18px;
  font-weight: 400;
}

.item {
  padding: 20px 30px;
  height: 120px;
  display: flex;
}

.item:nth-child(3) {
  border-top:  1px solid #E1E8EE;
  border-bottom:  1px solid #E1E8EE;
}
Now we’ve styled the basic structure of our shopping cart.
Let’s style our products in order.
The first elements are the delete and favorite buttons.
I’ve always loved Twitter’s heart button animation, I think it would look great on our Shopping Cart, let’s implement it.
.buttons {
  position: relative;
  padding-top: 30px;
  margin-right: 60px;
}
.delete-btn,
.like-btn {
  display: inline-block;
  Cursor: pointer;
}
.delete-btn {
  width: 18px;
  height: 17px;
  background: url("delete-icn.svg") no-repeat center;
}

.like-btn {
  position: absolute;
  top: 9px;
  left: 15px;
  background: url('twitter-heart.png');
  width: 60px;
  height: 60px;
  background-size: 2900%;
  background-repeat: no-repeat;
}
We set class “is-active” for when we click the button to animate it using jQuery, but this is for the next section.
.is-active {
  animation-name: animate;
  animation-duration: .8s;
  animation-iteration-count: 1;
  animation-timing-function: steps(28);
  animation-fill-mode: forwards;
}

@keyframes animate {
  0%   { background-position: left;  }
  50%  { background-position: right; }
  100% { background-position: right; }
}
Next, is the product image which needs a 50px right margin, and let’s add some basic style to product name and description.
.image {
  margin-right: 50px;
}

.description {
  padding-top: 10px;
  margin-right: 60px;
  width: 115px;
}

.description span {
  display: block;
  font-size: 14px;
  color: #43484D;
  font-weight: 400;
}

.description span:first-child {
  margin-bottom: 5px;
}
.description span:last-child {
  font-weight: 300;
  margin-top: 8px;
  color: #86939E;
}
Then we need to add a quantity element, where we have two buttons for adding or removing product quantity. First, make the CSS and then we’ll make it work by adding some JavaScript.
.quantity {
  padding-top: 20px;
  margin-right: 60px;
}
.quantity input {
  -webkit-appearance: none;
  border: none;
  text-align: center;
  width: 32px;
  font-size: 16px;
  color: #43484D;
  font-weight: 300;
}

button[class*=btn] {
  width: 30px;
  height: 30px;
  background-color: #E1E8EE;
  border-radius: 6px;
  border: none;
  cursor: pointer;
}
.minus-btn img {
  margin-bottom: 3px;
}
.plus-btn img {
  margin-top: 2px;
}

button:focus,
input:focus {
  outline:0;
}
And last, which is the total price of the product.
.total-price {
  width: 83px;
  padding-top: 27px;
  text-align: center;
  font-size: 16px;
  color: #43484D;
  font-weight: 300;
}
Let’s also make it responsive by adding the following lines of code:
@media (max-width: 800px) {
  .shopping-cart {
    width: 100%;
    height: auto;
    overflow: hidden;
  }
  .item {
    height: auto;
    flex-wrap: wrap;
    justify-content: center;
  }
  .image img {
    width: 50%;
  }
  .image,
  .quantity,
  .description {
    width: 100%;
    text-align: center;
    margin: 6px 0;
  }
  .buttons {
    margin-right: 20px;
  }
}
That’s it for the CSS.
JavaScript Part
Let’s make the heart animate when we click on it by adding the following code:
$('.like-btn').on('click', function() {
   $(this).toggleClass('is-active');
});
Cool! Now let’s make the quantity buttons work.
$('.minus-btn').on('click', function(e) {
e.preventDefault();
var $this = $(this);
var $input = $this.closest('div').find('input');
var value = parseInt($input.val());
if (value &gt; 1) {
value = value - 1;
} else {
value = 0;
}
$input.val(value);
});
$('.plus-btn').on('click', function(e) {
e.preventDefault();
var $this = $(this);
var $input = $this.closest('div').find('input');
var value = parseInt($input.val());
if (value &lt; 100) {
value = value + 1;
} else {
value =100;
}
$input.val(value);
});
And that’s it! You can download a sample project here and try it out yourself. Of course, you would need to add a checkout, payment gateway etc in a finished production version.