Git is a source code versioning system that lets you locally track changes and push or pull changes from remote resources. GitLab, GitHub, and Bitbucket are just some of the services that provides remote access to Git repositories. In addition to hosting your code, the services provide additional features designed to help manage the software development lifecycle. These additional features include managing the sharing of code between different people, bug tracking, wiki space and other tools for ‘social coding’.
Git commands are used for sharing and combining the code easily with other developers.
The following are the some basic Git commands can be used to work with Git.
The version of the Git can be checked by using the below command −
$ git --version
Add Git username and email address to identify the author while committing the information. Set the username by using the command as −
$ git config --global user.name "USERNAME"
After entering user name, verify the entered user name with the below command −
$ git config --global user.name
Next, set the email address with the below command −
$ git config --global user.email "email_address@example.com"
You can verify the entered email address as −
$ git config --global user.email
Use the below command to check the entered information −
$ git config --global --list
As per this (fantastic) simple guide, always create a new directory, open it and perform a
git init
to create a new git repository.
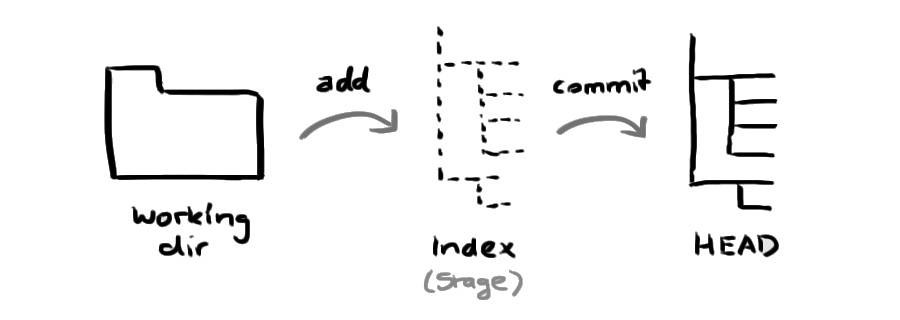
Your local repository consists of three “trees” maintained by git. the first one is your Working Directory which holds the actual files. the second one is the Index which acts as a staging area and finally the HEAD which points to the last commit you’ve made.
You can pull the latest changes made to the master branch by using the below command −
$ git checkout master
You can fetch the latest changes to the working directory with the below command −
$ git pull origin NAME-OF-BRANCH -u
Here, NAME-OF-BRANCH could be ‘master’ or any other existing branch.
Create a new branch with the below command −
$ git checkout -b branch-name
You can switch from one branch to other branch by using the command as −
$ git checkout branch-name
Check the changes made to your files with the below command −
$ git status
You will see the changes in red color and add the files to staging as −
$ git add file-name
Or you can add all the files to staging as −
$ git add *
Now send your changes to master branch with the below command −
$ git push origin branch-name
Delete the all changes, except unstaged things by using the below command −
$ git checkout .
You can delete the all changes along with untracked files by using the command as −
$ git clean -f
To merge the different branch with the master branch, use the below command −
$git checkout branch-name
$ git merge master
You can also merge the master branch with the created branch, by using the below command −
$git checkout master
$ git merge branch-name


