Using VirtualBox, HyperV or similar in the labs is a great way to fire up Virtual Machines. However, this method pretty much ties you to that lab machine, unless you are willing to do a (pretty big) export/import of your VM on a regular basis… not very realistic. What if you could access your VMs from anywhere in the college… or even outside… using just a browser? Well now you can!
The web server at https://xoa.comp.dkit.ie is a frontend for our internal cloud infrastructure in the School of Informatics and Creative Arts and is accessible from the outside world. Staff and students are encouraged to try our internal sandbox at http://xo.comp.dkit.ie before progressing to the Live Environment. The rest of this tutorial will talk about the sandbox, but the technology is pretty much the same.
How it works
The web frontend sits in front of (at least) 2 machines running Citrix Xenserver and allows for fine-grained permissions to different types of users.
Note: You must login (with your DkIT credentials) at least once before you can be added to a group that allows you to create VMs. After you have logged in, go to your lecturer (or ITLC contact) and request the necessary permissions.
Xenserver mounts files.comp.dkit.ie for access to operating system ISO files and saves VMs you create on our local NAS (Network Attached Storage). These VMs are given an IP address on a special isolated network away from the labs and other computers in DkIT.
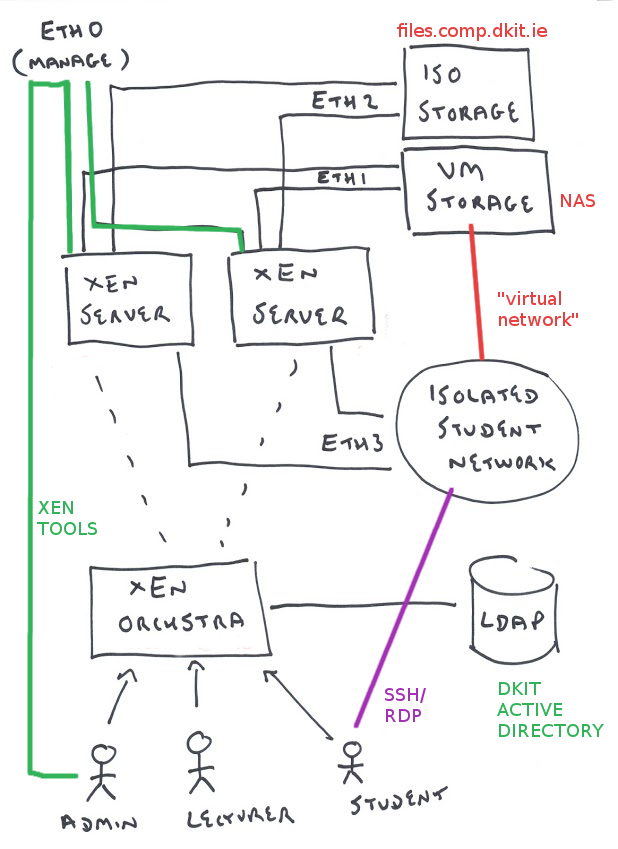
Different network traffic is carried on different network interfaces so everything is load balanced through the system. Once a student (or staff member) has created their VM, they can access it directly over SSH (for Linux) or RDP (for Windows) if that service is enabled in their VM.
Getting Started
Here are the steps to creating a Windows 2012 Server within the virtualization infrastructure.
Step 1
Once logged in, if you have permission, you can click on “New VM” link. Note the information on the page about DNS and Proxy Settings, you won’t see it again!
Step 2
Choose the “Pool” to create the VM on. Pools are made up of several backend machines working together as one. As there is only one choice in the dropdown list, this step is quite easy.
Step 3
On the next screen, we choose the “template” for our virtual machine. We are going to create a “Quick Instance” of Windows Server 2012.
Note: The difference between Quick Instance vs New Install is that one is an install of the OS from scratch and the other has the OS already installed with a user ready to login.
Step 4
You don’t really need to change the CPU, RAM or any other options in a Quick Instance as the most favourable settings have already been chosen for you. what is REALLY important though is that you alter the name and description for both the virtual machine AND the disk storage it uses. Failure to do this could result in your machine being deleted, without warning, the next time the system is cleaned up. You should use your DkIT login name and the os type in some way to create the labels.
Step 5
When you are all ready to go, click the “create” button.
Step 6
You will see this next screen when the machine boots. Click on “console” to see the screen as it would be on a real PC.
Step 7
All going according to plan, you should see your operating system boot in the usual manner.
Step 8
It is a common error to press CTRL + ALT + DEL on your own computer when the login screen appears. Don’t do this! Instead, click the button to CTRL + ALT + DEL the virtual machine via Xen Orchestra. Duh!
Step 9
The login password for Quick Instances is exactly the same as we use for the VirtualBox templates and in the specialist labs. Come on, you know this one!
Step 10
When you finally remember and input the correct password, you will be logged into the desktop. You can now find out the IP of the machine from a console and set up RDP plus whatever else you need to do.
Step 11
At any time you can return to the “Home” screen and fire up additional machines. Your existing machine(s) will stay running in the background. Create as many machines as you need for your project!
